I woke up this morning, watched Nate B. Jones talk about AI tools that most people are sleeping on, and by lunch I had a working video production pipeline inside my CLI. One slash command. Full branded video. My own cloned voice narrating it.
Here’s exactly how I built it, what I vetted before installing anything, and the prompts you need to do the same.
The End Result
Type /video in Claude Code. Describe what you want to say. Get back a branded MP4 with animated text, data visualizations, smooth transitions, and a voiceover that sounds like you.
My first real output: a 58-second YouTube Short about the EU Cyber Resilience Act deadline. Eight narrative beats (hook, problem, three stats, insight, solution, CTA), animated transitions, and my voice clone delivering the narration. Total hands-on time after the pipeline was built: about 10 minutes of prompting and reviewing.

The Stack
Three pieces, all free or cheap:
Claude Code (Anthropic): The AI coding agent that orchestrates everything
Remotion (open source): React-based video renderer that turns components into MP4 frames
ElevenLabs (API): Voice cloning and text-to-speech
Claude Code writes the React compositions, generates the render props, calls ElevenLabs for voiceover, and shells out to Remotion’s CLI to produce the final video. The human (me) describes the content and reviews the output. That’s it.
Step 0: Security Vetting (Before Installing Anything)
Why this comes first
This is the part most “build in public” posts skip, and it’s the part that matters most if you’re running AI tools with real access to your system. I don’t install packages directly. Ever.
Every new npm or pip package goes through an 8-phase sandboxed security pipeline before it touches my persistent environment.
The 8-Phase Pipeline
Here’s what safe-package-install.sh does:
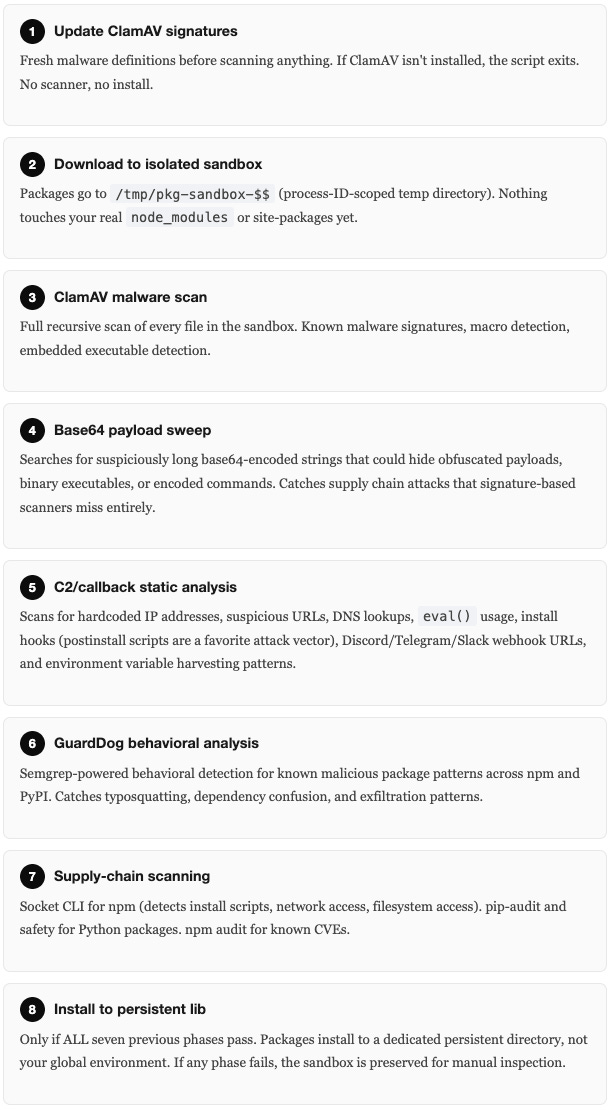
Why This Matters
When you install remotion (or any package), you’re pulling in hundreds of transitive dependencies. Any one of them could contain a postinstall script that phones home, harvests your SSH keys, or drops a reverse shell. The 8-phase pipeline catches these before they execute.
For Remotion specifically, I also made two deliberate security decisions:
Pinned to version 4.0.438. Versions 4.0.439 through 4.0.441 have a critical loader-utils prototype pollution vulnerability. I’ll upgrade when a clean version ships, and it’ll go through the full pipeline again.
Excluded
@remotion/mcp. This optional package makes unauthenticated calls to CrawlChat external servers. It’s in test phase with no auth mechanism. I use Remotion’s documentation directly instead.
Prompt: Build Your Own Security Gate
Build me a shell script called safe-package-install.sh that:
1. Takes two args: package manager type (npm or pip) and package name(s)
2. Downloads packages to an isolated /tmp sandbox (never to my real environment)
3. Runs ClamAV scan on the sandbox
4. Sweeps for base64-encoded payloads longer than 200 chars
5. Does static analysis for: hardcoded IPs, suspicious URLs, eval() calls,
   postinstall hooks, webhook URLs (Discord/Telegram/Slack), env var harvesting
6. Runs GuardDog behavioral analysis (if installed)
7. Runs supply-chain checks (Socket for npm, pip-audit for Python)
8. Only installs to a persistent lib directory if ALL checks pass
9. Preserves the sandbox for inspection if anything fails
10. Logs everything to a security scan log

Exit 0 = installed, exit 1 = blocked with reason, exit 2 = usage error.
Step 1: Install Remotion (Through the Pipeline)
# NEVER run npm install directly. Use the security pipeline.
.claude/hooks/safe-package-install.sh npm remotion @remotion/cli @remotion/transitions react react-dom
After the pipeline passes (0 vulnerabilities at 4.0.438, ClamAV clean, GuardDog clean), Remotion installs to ~/.claude/node_lib/.
Then initialize the project:
mkdir -p ~/.claude/remotion/src/compositions
mkdir -p ~/.claude/remotion/src/lib
mkdir -p ~/.claude/remotion/public/audio
cd ~/.claude/remotion && npm init -y
Step 2: Build Video Compositions
This is where Claude Code does the heavy lifting. You describe the video format you want, and Claude writes the React components.
The Core Concept
Remotion treats video like a React app. Each frame is a React render. You use useCurrentFrame() to know which frame you’re on, interpolate() to animate values, and spring() for physics-based easing. A <Composition> registers a component with dimensions, duration, and FPS.
What I Asked Claude to Build
I have four composition templates:
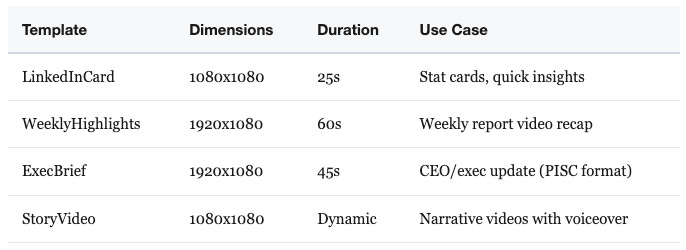
The StoryVideo composition is the most interesting. It uses a “beat” system where each segment of the video has a type that determines its visual layout and animation:
hook: Full-screen headline, dramatic entrance
problem: Supporting context with accent color
stat: Big number with context label and scale animation
insight: Key takeaway with distinct visual treatment
solution: Feature list with staggered bullet reveals
cta: Call to action with urgency styling
logo: Brand close
The Beat Props Structure
This is the JSON that drives video generation. Here’s a simplified example:
{
  "beats": [
    {
      "type": "hook",
      "headline": "Your devices aren't compliant. You have 6 months.",
      "subtext": "EU Cyber Resilience Act - October 2026"
    },
    {
      "type": "stat",
      "headline": "Devices at risk across the EU",
      "stat": "147M",
      "statContext": "DEVICES AT RISK",
      "accent": "yellow",
      "durationSecs": 10.8
    },
    {
      "type": "insight",
      "headline": "The fastest path is PKI-native device identity from day one.",
      "subtext": "Certificate lifecycle automation. Audit-ready from first boot.",
      "accent": "blue"
    },
    {
      "type": "cta",
      "headline": "Book your CRA readiness assessment.",
      "subtext": "Free 45-minute session. Link in comments.",
      "accent": "blue"
    }
  ],
  "voiceover": {
    "file": "audio/cra-voiceover.mp3",
    "durationSecs": 56.5
  }
}
When a voiceover is attached, beats with durationSecs get redistributed proportionally to match the actual audio length. Fixed beats (like logo closes) keep their exact timing.
Prompt: Build Video Compositions
Build a Remotion composition called StoryVideo with these requirements:
- 1080x1080 square format, 30fps
- Accepts an array of "beats" with types: hook, problem, stat, insight, solution, cta, logo
- Each beat type has a visually distinct layout with unique animations and colors
- Use @remotion/transitions for varied transitions between beats
- Support an optional voiceover prop that:
  - Plays audio continuously via <Audio>
  - Redistributes beat durations proportionally to match audio length
  - Allows individual beats to be marked "fixed" (excluded from redistribution)
- Use spring() for entrances and interpolate() for value mapping
- Brand colors: navy #003087, blue #00A3E0, dark bg #0A0F1E
- Font: Inter (system font stack fallback)
Step 3: Add Voice Cloning (ElevenLabs)
This is the piece that takes it from “animated text” to “actual video content.”
Clone Your Voice
Go to ElevenLabs, create an account
Upload voice samples (I used recordings from meetings and presentations, about 5 minutes total)
ElevenLabs generates a voice clone. You get a Voice ID.
Store Credentials Securely
API keys never go in code, env files, or shell config. macOS Keychain only:
security add-generic-password -a $USER -s "ELEVENLABS_API_KEY" -w "your-api-key-here"
security add-generic-password -a $USER -s "ELEVENLABS_VOICE_ID" -w "your-voice-id-here"
The Python script reads them at runtime:
def keychain_get(service: str) -> str:
    result = subprocess.run(
        ["security", "find-generic-password", "-s", service, "-w"],
        capture_output=True, text=True, check=True
    )
    return result.stdout.strip()
Voice Settings
These control how the clone sounds. After testing, here’s what works for narration:
VOICE_SETTINGS = {
    "stability": 0.55,         # Natural variance without being erratic
    "similarity_boost": 0.80,  # Strong clone fidelity
    "style": 0.20,             # Subtle expressiveness
    "use_speaker_boost": True, # Clarity boost for voiceover
}
The Voiceover Generation Script
The generate-voiceover.py script:
Reads API key and Voice ID from macOS Keychain
Sends your narration text to ElevenLabs’
eleven_multilingual_v2modelSaves the MP3 to the Remotion project’s
public/audio/directoryParses the MP3 frame headers to calculate exact duration
Outputs JSON with file path, duration, and character count
Prompt: Build Voiceover Generator
Build a Python script called generate-voiceover.py that:
- Reads ELEVENLABS_API_KEY and ELEVENLABS_VOICE_ID from macOS Keychain
  (using "security find-generic-password -s SERVICE -w")
- Takes --script (narration text) and --output (relative path) args
- Calls ElevenLabs TTS API with eleven_multilingual_v2 model
- Saves MP3 to ~/.claude/remotion/public/<output>
- Calculates MP3 duration by parsing frame headers (not ffprobe dependency)
- Outputs JSON to stdout: {"file": "...", "duration_secs": 42.3, "chars": 340}
- Uses only stdlib (urllib, json, subprocess) - no pip dependencies
- Supports --speed flag (0.7 to 1.2x)
Step 4: Wire It All Together
The render-with-voice.sh script is a 4-step pipeline:
Generate voiceover via ElevenLabs
Inject audio metadata into the story props JSON (merges voiceover file path and duration)
Render via Remotion CLI with the merged props
Report output path and file size
Usage:
~/.claude/remotion/render-with-voice.sh \
  --script "Your narration as a natural paragraph, about 130 words per minute." \
  --slug "cra-compliance"
Output lands in 03-OUTPUTS/video/2026-03-27-StoryVideo-cra-compliance.mp4.
Prompt: Build the Render Pipeline
Build a bash script called render-with-voice.sh that:
1. Takes --script (narration text), --slug (filename slug), --props (optional JSON path)
2. Calls generate-voiceover.py with the script text
3. Parses the JSON output to get audio file path and duration
4. Merges the voiceover metadata into the story props JSON (write to /tmp, not shell variable)
5. Runs: npx remotion render StoryVideo <output.mp4> --props=<merged.json> --log=error
6. Outputs to ~/03-OUTPUTS/video/YYYY-MM-DD-StoryVideo-<slug>.mp4
7. Reports file size and duration when done
8. Cleans up temp files
Step 5: Create the /video Skill
In Claude Code, a “skill” is a slash command that expands into a full prompt. Creating one is straightforward: write a markdown file in .claude/skills/ that describes the workflow.
The /video skill tells Claude Code:
Which compositions are available and their dimensions
How to structure beat props for StoryVideo
When to use voiceover vs. silent rendering
Where to output files
How to call the render scripts
When I type /video, Claude Code reads this skill file, asks me what I want to make, builds the props JSON, generates voiceover if needed, and renders the video.
Prompt: Build Your /video Skill
Create a Claude Code skill file at .claude/skills/video.md that:
- Documents all available Remotion compositions (names, dimensions, durations, use cases)
- Includes the full props schema for each composition
- Provides the render command syntax
- Explains the voiceover workflow (when to use render-with-voice.sh vs direct render)
- Sets output directory to 03-OUTPUTS/video/
- Uses naming convention: YYYY-MM-DD-<Composition>-<slug>.mp4
- Tells Claude to keep text tight: headlines max 8 words, bullets max 12 words
The Full Workflow (From Idea to Published Video)
Here’s what actually happens when I make a video now:
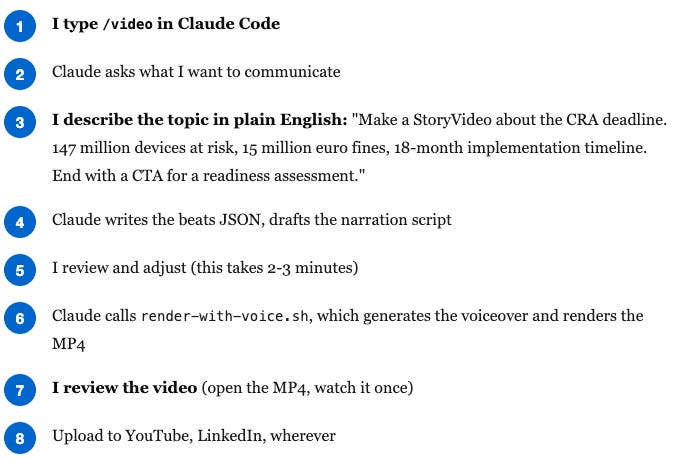
Total time from idea to published: about 10-15 minutes, including review. The video that prompted this post went through 8 iterations to get the pacing right, and even that full cycle was done in a single sitting.
What This Actually Cost
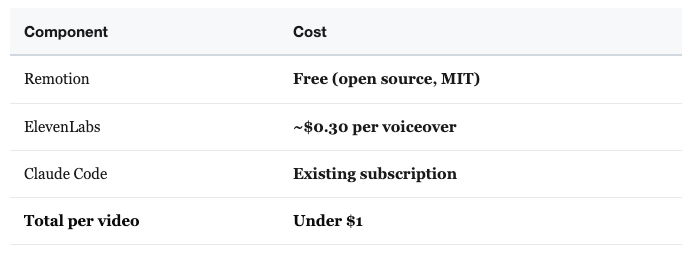
Compare that to hiring a video editor, licensing stock footage, and waiting days for revisions. Or compare it to the time cost of learning After Effects well enough to produce something watchable.
The Larger Point
The gap between “I have an idea” and “I have a published video” used to be weeks and thousands of dollars. Now it’s a text prompt and a cup of coffee.
The security layer is not optional. Every package in this pipeline went through an 8-phase security scan before it touched my system. Every API key lives in Keychain, not in code. Every dependency is version-pinned with a documented reason. Every hook and script is integrity-checked against a sha256 baseline.
Building AI superpowers without building AI guardrails is just building a faster way to get compromised.
The tools are here. The barrier to entry is gone. What you build with them, and how responsibly you build it, is what separates credential collectors from artifact creators.
Watch the original video on YouTube
All prompts, props structures, and security scripts referenced in this post are production configurations from my actual Claude Code setup. If you build this and want to compare notes, find me on Substack or LinkedIn.